Well, its been a while since I posted on this thread. A lot has changed as far as my solar setup. My setup is complete. It was a real learning experience for me. As I said in an earlier post, I am slow, but I kept researching until I had most of what I needed to know and then went for it. What I have done is not ground breaking, nor is there really anything new here. It has all been posted about before in this forum. But I will tell you how it went for me.
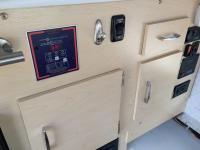
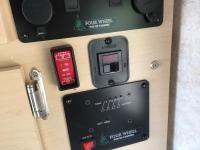
I ordered Bogarts SC2030 charge controller and their Trimetric TM2030A and a 500A/50mV shunt and battery compartment temp sensor. I also ordered a Blue Sea ML ACR automatic charge relay model 7622 with SPDT control switch, Zamp portable power port , 2 Solar Cynergy 160 watt 12V solar panels, MC4 wiring and 2 MC4 "Y" connectors to wire my panels in parallel. I also bought a lot of other wire and connectors of various sizes to complete this job. Oh, and I almost forgot, 2 group 31 Concord Lifeline AGM batteries for a whopping $330 apiece! Not exactly sure what all this cost, but probably around $1500 if not more. But, by far and away, the biggest investment in all of this was time. Time researching online, ordering, waiting for things to come in the mail, driving to hardware stores, electronic stores, and solar stores.
The install went pretty well though. The manuals that you can download from Bogart Engineering's website are great. As well as the Blue Sea ACR manual from online. They both have wiring diagrams that are quite helpful. Borgarts info was great. Very in depth. And of course info from this forum is vast and invaluable also. There are some really smart people on this site.
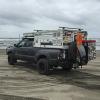
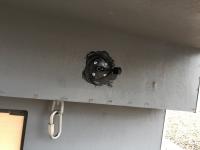
The space I had to work with was quite limited, but I managed to squeeze it all in there, as you can see from the pics below. I installed a Marinco plug in the bed of the truck, but it is rated at 40 amps and my inline fuses from the truck (6 AWG) are 60 amp. So I ordered a 70 amp plug from Marinco. Still waiting for that. The 40 amp receptacle accepts 6 AWG coming in, but then you have to use 8 AWG coming out of the plug, for a few inches, then go back to 6, whereas the 70 amp Marinco allows 6 on both sides.
I removed the 85 watt panel on the roof and it is now my portable. I have 25 feet of wiring for that. I installed one of the 160 watt panels where the 85 was using the Yakima track. The other 160 watt required that I cut out the center piece of aluminum on my luggage rack. You can see that piece in the photo above. Once that was out I was able to mount the panel there using aluminum L brackets and 3/16 inch diameter pop rivets. I'll post those pics later, but it fits just perfectly down inside the luggage rack, and the rack is still usable!
This project required an amazing amount of different size electrical connectors, terminal rings, wire, heat shrink, zip ties, and so on. I saved the installation of the solar panels for the very last and that is where I ran into my biggest problem. I wired them in parallel using the MC4 Y connectors and MC4 wiring. After hooking them up ( a pretty simple job, really) I plugged them into the plug on the roof. I checked the solar charge controller, expecting to see a yellow charge light and a green blinking light indicating the type of charging. I saw neither. I had already hooked up the portable panel through the Zamp power port I installed, and so I knew the charge controller was working. I was baffled. So I hooked up each 160 watt panel separately through the Zamp port and each showed charging on the charge controller. So the panels were OK. And I hooked up the portable panel into the outlet on the roof and that showed charging as well. So it had to be in the parallel wiring connections between the two 160 watt panels.
I pulled all the wires apart and checked each wire separately for continuity. I also checked the Y connectors for continuity. Everything checked out good. I then started wiring it up again, but this time, checking for continuity after each connection, All was good until I got to the last connection. One of the MC4 connectors connected to the Y connector was not making the an actual electrical connection. I did some more research online and found out the it is recommended that all MC4 type connectors be off the same brand. Some brands make them slightly different, and they may not connect. They will look connected, but are not. The company that I ordered the wiring from sent me 2 different brands. I actually had 4 pieces of that MC4 wiring and none would make that connection. So I went to a local solar store and tried a different brand, and it worked.
So all seems to be working fine now, although I have only tested it in the driveway. We are looking forward to taking it out into the desert in a week or so and give it a real test. The Trimetric is great! It is amazing to see what each electrical item draws. Now I have 405 watts of power! If I happen to be driving by a small town, that has had a power outage, I can stop and let them hook up for a while!! Pics below:
Edited by captainphx, 09 January 2017 - 11:48 PM.